
- Download Price:
- Free
- Dll Description:
- NCTWMVFile ActiveX DLL
- Versions:
- Size:
- 0.19 MB
- Operating Systems:
- Directory:
- N
- Downloads:
- 705 times.
About Nctwmvfile.dll
The Nctwmvfile.dll file is 0.19 MB. The download links for this file are clean and no user has given any negative feedback. From the time it was offered for download, it has been downloaded 705 times.
Table of Contents
- About Nctwmvfile.dll
- Operating Systems Compatible with the Nctwmvfile.dll File
- All Versions of the Nctwmvfile.dll File
- Steps to Download the Nctwmvfile.dll File
- How to Fix Nctwmvfile.dll Errors?
- Method 1: Copying the Nctwmvfile.dll File to the Windows System Folder
- Method 2: Copying The Nctwmvfile.dll File Into The Software File Folder
- Method 3: Doing a Clean Install of the software That Is Giving the Nctwmvfile.dll Error
- Method 4: Solving the Nctwmvfile.dll error with the Windows System File Checker
- Method 5: Fixing the Nctwmvfile.dll Errors by Manually Updating Windows
- Common Nctwmvfile.dll Errors
- Other Dll Files Used with Nctwmvfile.dll
Operating Systems Compatible with the Nctwmvfile.dll File
All Versions of the Nctwmvfile.dll File
The last version of the Nctwmvfile.dll file is the 1.4.1.140 version.This dll file only has one version. There is no other version that can be downloaded.
- 1.4.1.140 - 32 Bit (x86) Download directly this version
Steps to Download the Nctwmvfile.dll File
- Click on the green-colored "Download" button (The button marked in the picture below).

Step 1:Starting the download process for Nctwmvfile.dll - When you click the "Download" button, the "Downloading" window will open. Don't close this window until the download process begins. The download process will begin in a few seconds based on your Internet speed and computer.
How to Fix Nctwmvfile.dll Errors?
ATTENTION! Before beginning the installation of the Nctwmvfile.dll file, you must download the file. If you don't know how to download the file or if you are having a problem while downloading, you can look at our download guide a few lines above.
Method 1: Copying the Nctwmvfile.dll File to the Windows System Folder
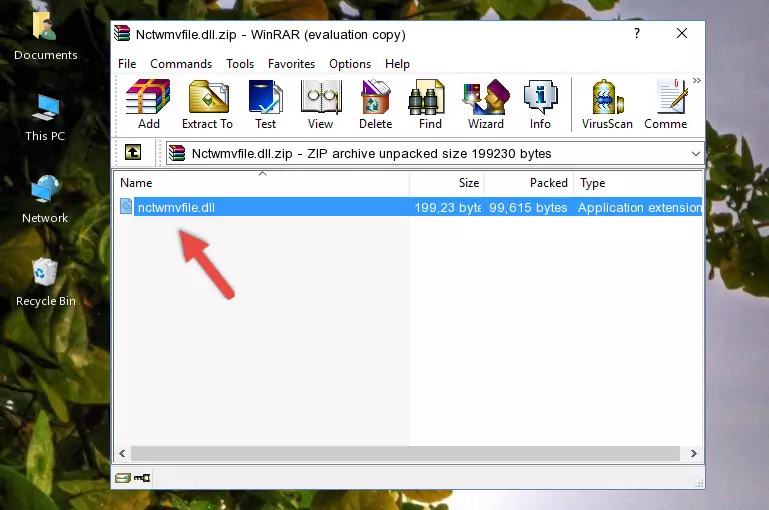
- The file you are going to download is a compressed file with the ".zip" extension. You cannot directly install the ".zip" file. First, you need to extract the dll file from inside it. So, double-click the file with the ".zip" extension that you downloaded and open the file.
- You will see the file named "Nctwmvfile.dll" in the window that opens up. This is the file we are going to install. Click the file once with the left mouse button. By doing this you will have chosen the file.
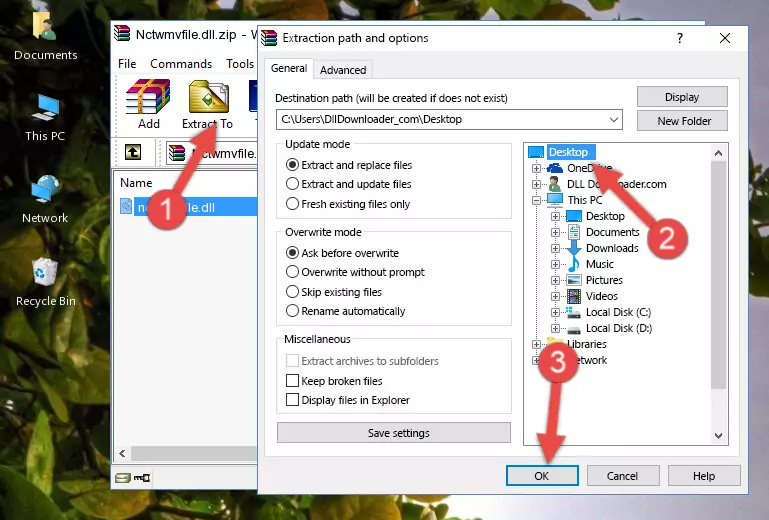
Step 2:Choosing the Nctwmvfile.dll file - Click the "Extract To" symbol marked in the picture. To extract the dll file, it will want you to choose the desired location. Choose the "Desktop" location and click "OK" to extract the file to the desktop. In order to do this, you need to use the Winrar software. If you do not have this software, you can find and download it through a quick search on the Internet.
Step 3:Extracting the Nctwmvfile.dll file to the desktop - Copy the "Nctwmvfile.dll" file file you extracted.
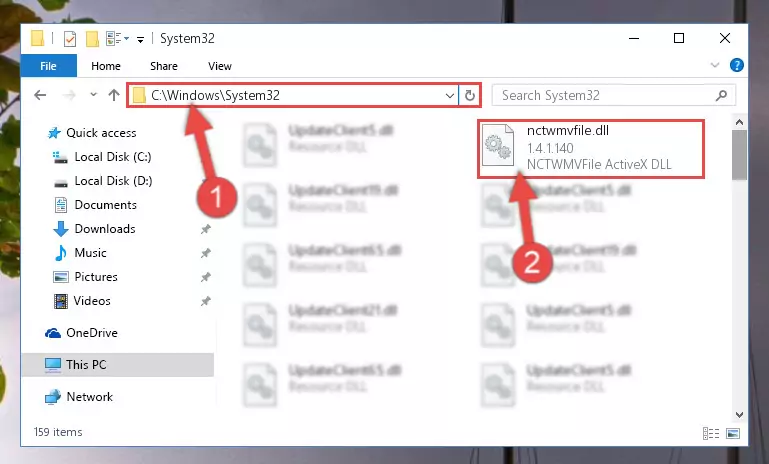
- Paste the dll file you copied into the "C:\Windows\System32" folder.
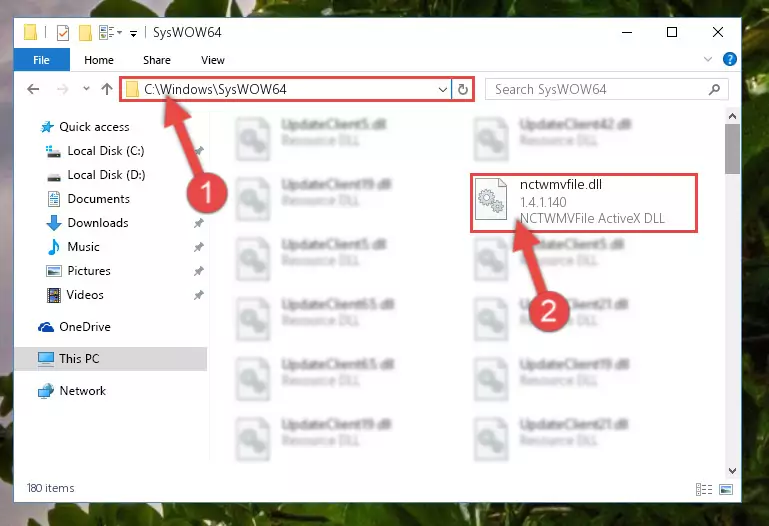
Step 5:Pasting the Nctwmvfile.dll file into the Windows/System32 folder - If you are using a 64 Bit operating system, copy the "Nctwmvfile.dll" file and paste it into the "C:\Windows\sysWOW64" as well.
NOTE! On Windows operating systems with 64 Bit architecture, the dll file must be in both the "sysWOW64" folder as well as the "System32" folder. In other words, you must copy the "Nctwmvfile.dll" file into both folders.
Step 6:Pasting the Nctwmvfile.dll file into the Windows/sysWOW64 folder - In order to complete this step, you must run the Command Prompt as administrator. In order to do this, all you have to do is follow the steps below.
NOTE! We ran the Command Prompt using Windows 10. If you are using Windows 8.1, Windows 8, Windows 7, Windows Vista or Windows XP, you can use the same method to run the Command Prompt as administrator.
- Open the Start Menu and before clicking anywhere, type "cmd" on your keyboard. This process will enable you to run a search through the Start Menu. We also typed in "cmd" to bring up the Command Prompt.
- Right-click the "Command Prompt" search result that comes up and click the Run as administrator" option.

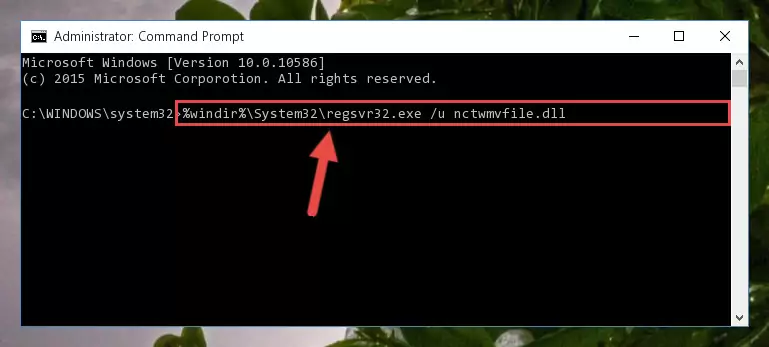
Step 7:Running the Command Prompt as administrator - Let's copy the command below and paste it in the Command Line that comes up, then let's press Enter. This command deletes the Nctwmvfile.dll file's problematic registry in the Windows Registry Editor (The file that we copied to the System32 folder does not perform any action with the file, it just deletes the registry in the Windows Registry Editor. The file that we pasted into the System32 folder will not be damaged).
%windir%\System32\regsvr32.exe /u Nctwmvfile.dll
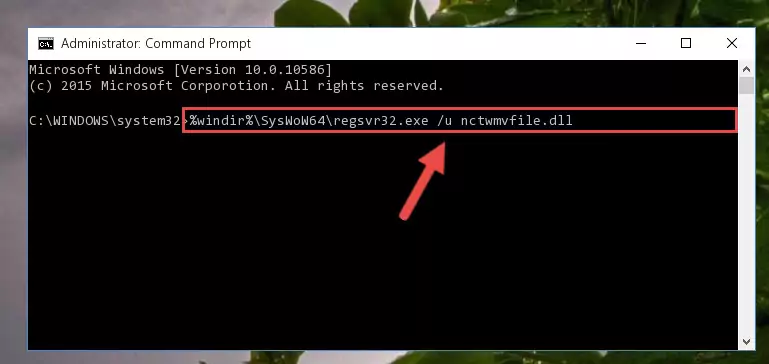
Step 8:Deleting the Nctwmvfile.dll file's problematic registry in the Windows Registry Editor - If the Windows you use has 64 Bit architecture, after running the command above, you must run the command below. This command will clean the broken registry of the Nctwmvfile.dll file from the 64 Bit architecture (The Cleaning process is only with registries in the Windows Registry Editor. In other words, the dll file that we pasted into the SysWoW64 folder will stay as it is).
%windir%\SysWoW64\regsvr32.exe /u Nctwmvfile.dll

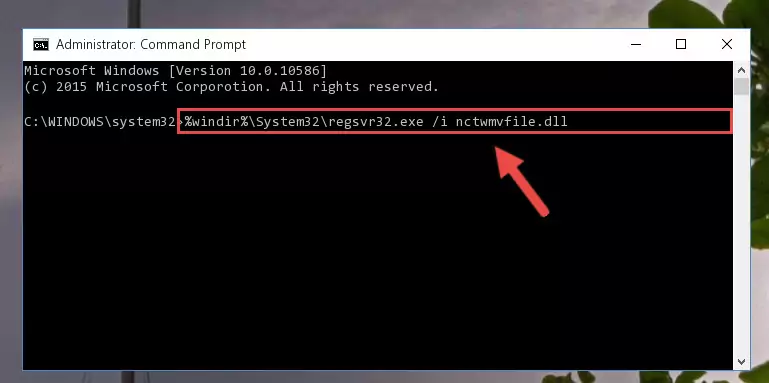
Step 9:Uninstalling the broken registry of the Nctwmvfile.dll file from the Windows Registry Editor (for 64 Bit) - In order to cleanly recreate the dll file's registry that we deleted, copy the command below and paste it into the Command Line and hit Enter.
%windir%\System32\regsvr32.exe /i Nctwmvfile.dll
Step 10:Reregistering the Nctwmvfile.dll file in the system - Windows 64 Bit users must run the command below after running the previous command. With this command, we will create a clean and good registry for the Nctwmvfile.dll file we deleted.
%windir%\SysWoW64\regsvr32.exe /i Nctwmvfile.dll
Step 11:Creating a clean and good registry for the Nctwmvfile.dll file (64 Bit için) - If you did all the processes correctly, the missing dll file will have been installed. You may have made some mistakes when running the Command Line processes. Generally, these errors will not prevent the Nctwmvfile.dll file from being installed. In other words, the installation will be completed, but it may give an error due to some incompatibility issues. You can try running the program that was giving you this dll file error after restarting your computer. If you are still getting the dll file error when running the program, please try the 2nd method.
Method 2: Copying The Nctwmvfile.dll File Into The Software File Folder
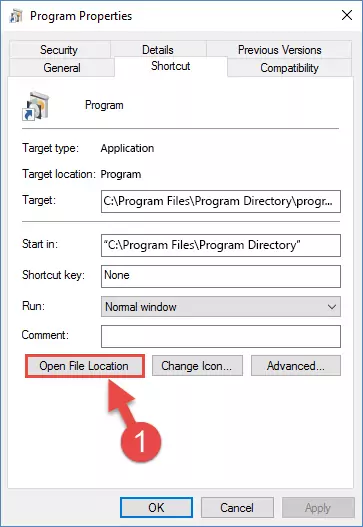
- First, you need to find the file folder for the software you are receiving the "Nctwmvfile.dll not found", "Nctwmvfile.dll is missing" or other similar dll errors. In order to do this, right-click on the shortcut for the software and click the Properties option from the options that come up.
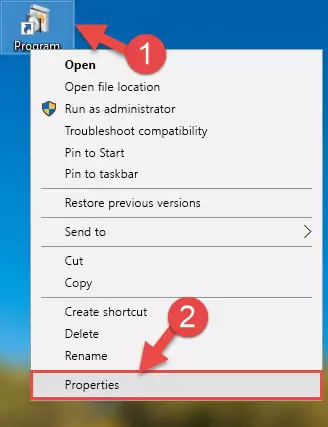
Step 1:Opening software properties - Open the software's file folder by clicking on the Open File Location button in the Properties window that comes up.
Step 2:Opening the software's file folder - Copy the Nctwmvfile.dll file.
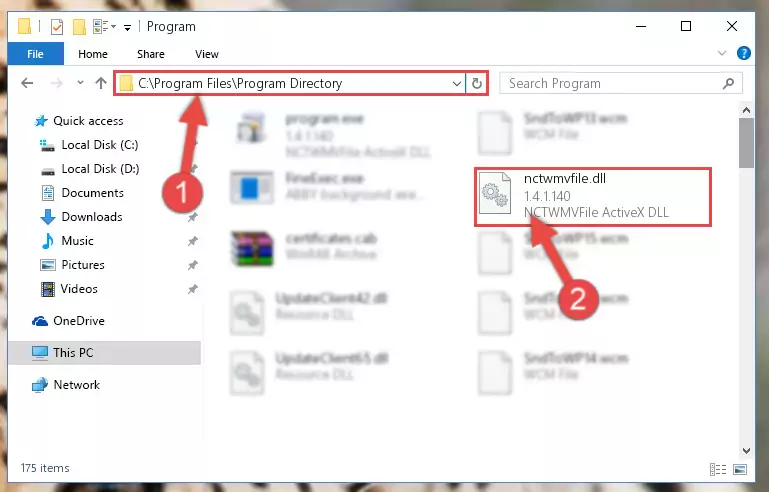
- Paste the dll file you copied into the software's file folder that we just opened.
Step 3:Pasting the Nctwmvfile.dll file into the software's file folder - When the dll file is moved to the software file folder, it means that the process is completed. Check to see if the problem was solved by running the software giving the error message again. If you are still receiving the error message, you can complete the 3rd Method as an alternative.
Method 3: Doing a Clean Install of the software That Is Giving the Nctwmvfile.dll Error
- Open the Run tool by pushing the "Windows" + "R" keys found on your keyboard. Type the command below into the "Open" field of the Run window that opens up and press Enter. This command will open the "Programs and Features" tool.
appwiz.cpl
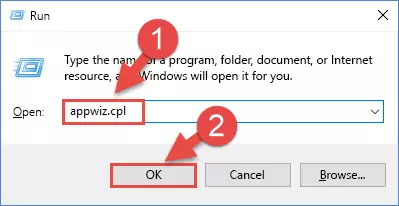
Step 1:Opening the Programs and Features tool with the appwiz.cpl command - The Programs and Features window will open up. Find the software that is giving you the dll error in this window that lists all the softwares on your computer and "Right-Click > Uninstall" on this software.
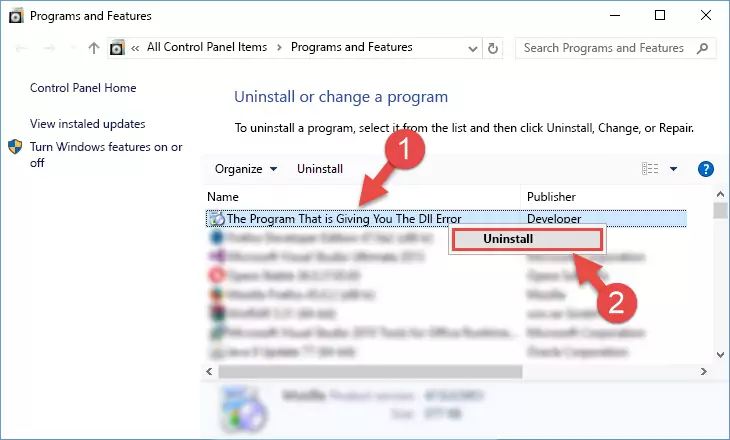
Step 2:Uninstalling the software that is giving you the error message from your computer. - Uninstall the software from your computer by following the steps that come up and restart your computer.

Step 3:Following the confirmation and steps of the software uninstall process - After restarting your computer, reinstall the software that was giving the error.
- This process may help the dll problem you are experiencing. If you are continuing to get the same dll error, the problem is most likely with Windows. In order to fix dll problems relating to Windows, complete the 4th Method and 5th Method.
Method 4: Solving the Nctwmvfile.dll error with the Windows System File Checker
- In order to complete this step, you must run the Command Prompt as administrator. In order to do this, all you have to do is follow the steps below.
NOTE! We ran the Command Prompt using Windows 10. If you are using Windows 8.1, Windows 8, Windows 7, Windows Vista or Windows XP, you can use the same method to run the Command Prompt as administrator.
- Open the Start Menu and before clicking anywhere, type "cmd" on your keyboard. This process will enable you to run a search through the Start Menu. We also typed in "cmd" to bring up the Command Prompt.
- Right-click the "Command Prompt" search result that comes up and click the Run as administrator" option.
Step 1:Running the Command Prompt as administrator - Paste the command below into the Command Line that opens up and hit the Enter key.
sfc /scannow
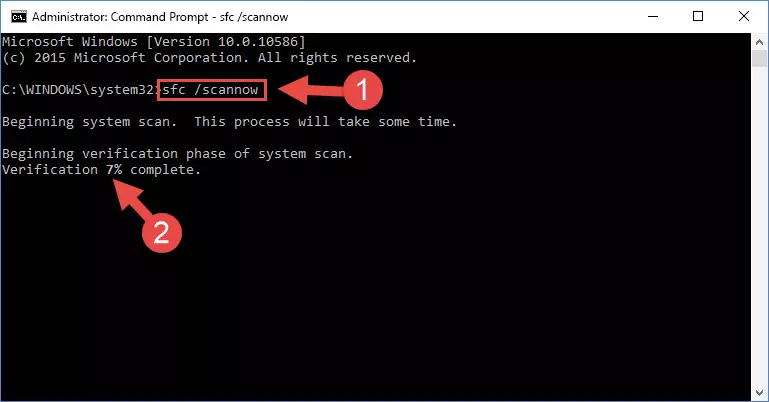
Step 2:Scanning and fixing system errors with the sfc /scannow command - This process can take some time. You can follow its progress from the screen. Wait for it to finish and after it is finished try to run the software that was giving the dll error again.
Method 5: Fixing the Nctwmvfile.dll Errors by Manually Updating Windows
Some softwares need updated dll files. When your operating system is not updated, it cannot fulfill this need. In some situations, updating your operating system can solve the dll errors you are experiencing.
In order to check the update status of your operating system and, if available, to install the latest update packs, we need to begin this process manually.
Depending on which Windows version you use, manual update processes are different. Because of this, we have prepared a special article for each Windows version. You can get our articles relating to the manual update of the Windows version you use from the links below.
Guides to Manually Update the Windows Operating System
Common Nctwmvfile.dll Errors
When the Nctwmvfile.dll file is damaged or missing, the softwares that use this dll file will give an error. Not only external softwares, but also basic Windows softwares and tools use dll files. Because of this, when you try to use basic Windows softwares and tools (For example, when you open Internet Explorer or Windows Media Player), you may come across errors. We have listed the most common Nctwmvfile.dll errors below.
You will get rid of the errors listed below when you download the Nctwmvfile.dll file from DLL Downloader.com and follow the steps we explained above.
- "Nctwmvfile.dll not found." error
- "The file Nctwmvfile.dll is missing." error
- "Nctwmvfile.dll access violation." error
- "Cannot register Nctwmvfile.dll." error
- "Cannot find Nctwmvfile.dll." error
- "This application failed to start because Nctwmvfile.dll was not found. Re-installing the application may fix this problem." error